

| This section describes how to use the interface of the Nintendo 64-specific Direct Translator. For information on how to run the translator, see Using the MakeGame Plug-in on page 9 and Using Translators from the Command Line on page 15. |
The Nintendo 64 plug-in and its documentation are available to Nintendo-certified developers only.
The part number of the Nintendo 64 translator is PA-NU64N. To receive the translator you must request it from Alias|Wavefront and show that you are a certified Nintendo 64 developer.
The Nintendo 64 translator converts Alias wire models to C source code for use with the Nintendo 64.
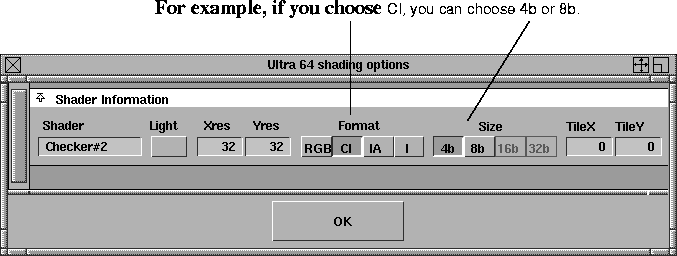
Default texture output is a 32 by 32 pixel 32 bit RGBA image, but you can change this using the Ultra 64 shading options window.
To install the Nintendo 64 translator:
Run the InstallGame script to install the Nintendo-specific libraries (see Installing Platform Specific Libraries on page 6).
See Testing the Output on page 29 for information on installing the sample viewer program on your Nintendo developer system.
/usr/aw/alias/ODS/Games/
bin/<shell scripts>
Dtplugins/<translator>
source/Nintendo/
src/<translator source code>
viewer/<viewer source code>
f3dex/<new F3DEX viewer source code>
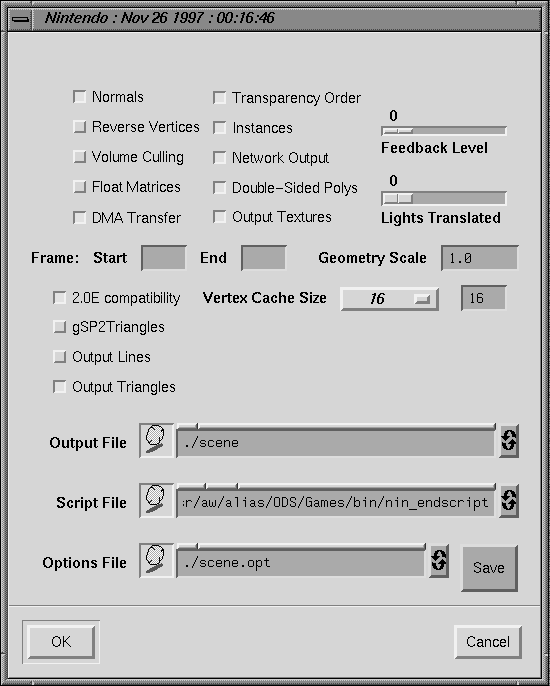
When you run the translator from MakeGame, the Nintendo 64 Translator window appears. Use this window to set the options described below, then click Go to start converting.
ON = store normals on the vertices.
Note: if you output a model with normals, make sure it is lit, and that the Lights Translated slider is greater than zero.
reverse the order of vertices in every triangle in the model.
generate volume culling code for each group in the model.
Note: this option is not currently available.
include the floating point representations of the transformation matrices as comments.
generate code to do DMA transfers of animation transformations into the display list.
sort the groups so transparent groups are rendered after opaque groups. This is necessary for correct Z-buffering for models with both transparent and opaque groups.
translate instances in the wire model intelligently (use the display list in the output code to simulate instances).
output MetaCycle information and source code.
Double-Sided Polys ON = use the information in the Render Stats window to determine double-sided and single-sided groups.
OFF = translate all polygons as single-sided (with appropriate back-culling code).
start and end frames of animation.
Note: these frame numbers are relative to the start frame you entered in the MakeGame window. For example, if you entered frame 65 as the start frame in the MakeGame window, then frame 0 here will refer to frame 65 of the original Alias animation.
number from 0 to 9 specifying the level of messages and updates to provide during translation.
Level 0 means the translator will only print error messages. Messages above level 3 are only of interest to developers.
maximum number of lights to translate into model code.
If you are outputting normals, set this number higher than zero. If you are using surface colors instead of normals, set this number to 0.
If you output normals, but set this number to 0, the model will appear brightly lit in a rainbow of colors (because the Nintendo 64 treats the normals as colors).
the translator will scale the whole model by this factor before conversion.
Note: this is in addition to scaling applied by MakeGame or DtExport.
turn off other options in the window that don't work with earlier versions of the Nintendo 64 microcode.
use a new microcode command to render two triangles with one command.
ON = output lines and/or triangles
The lines are the edges of the triangles that would be output otherwise. the translator does not output NURBS curves.
choose from various default values corresponding to F3DEX microcode versions, or enter a custom value.
path and stub name (without any extension) of output files. You can use standard SGI drag-and-drop into the icon drop pocket on the left.
a script or executable to run after translation. The translator passes two arguments to the script: the directory containing the output files. and the stem name (see below).
Alias|Wavefront supplies a script (nin_endscript) for automatically downloading and testing output code on a Nintendo development system. See Testing the Output on page 29.
file containing GetNintendo settings (values for all the settings above). This file is read when the GetNintendo window opens, and saved when you click Save or OK.
path to the directory where output files will be created. (This is the same as the directory path you specified in the MakeGame window).
the base name of all output files. Suffixes are added to this name to create the different types of output. (This is the same as the directory path you specified in the MakeGame window).
To open the Ultra 64 shading options window:
In the Tool Palette, select Object Edit  Ultra64-
 :
:
The Size buttons are available according to the Format you choose.
The Nintendo 64 Demo Viewer is in the source tree, in the Games area of the standard Alias installation. You can use the Demo viewer with the Indy development system and the Partner 64 systems.
| This section assume the Partner 64 system is installed correctly in /usr/local/partner. |
| When using the Partner-N64 system, make sure the Partner hardware and software are properly installed. In particular, make sure your .cshrc file sets the $PTHOST environment variable to the correct network name of the development system (for example: setenv PTHOST n64_dev1). |
You need to do two things to install the Demo Viewer:
You need to copy the sources from the Alias installation (which is owned by root) to a working directory in your home directory.
cd
mkdir -p n64/demo
cp /usr/aw/alias/ODS/Games/source/Nintendo/f3dex/* n64/demo
The Alias installation includes the nin_endscript shell script, which automatically compiles and downloads the translator output to a development board. You can modify this script to set the following options:
Set usingPartner to 0 for an Indy board, 1 for a Partner 64 system.
Set run_locally to 0 if the development board is on your local workstation, 1 if the development board is on a remote machine on the network.
If the development board is on your local workstation, comment out use_host.
If the development board is on a remote machine, uncomment use_host and set it to the network name of the remote host.
Set MAKE to the path of the make program. The default is /usr/bin/make.
If the $PTHOST environment variable or default name are correct, comment out pthost.
If the $PTHOST and default names cannot be used, set pthost to the network name of the Partner development system.
To use a Partner 64 system on a remote machine, your system administrator must make the following changes on the remote system:
This is set in the /etc/hosts.equiv file, or in a local .rhosts file.
On the SGI desktop, this is set using the Customize: Desktop control panel in the Desktop menu. Turn on the Enable Remote Display option.
Alias|Wavefront currently supports the following development systems:
nin_endscript and nin_endscriptWrapper build a ROM from the viewer code and download it to a Nintendo 64 development console.
These scripts are run automatically by MakeGame and DtExport when you convert a model.
| If the files are located on a remote machine, the scripts will use rsh to run the ROM building process. Using this feature, several users can create and translate models, and share one development workstation for viewing their output. |
If nothing is visible in the demo viewer after the model downloads, press the "L" button on the console's control pad to show the onscreen menu and make sure the download was successful.
Use the Nintendo 64 controller to view the model in the Demo Viewer:


