SPONSORED LINKS
The Z64
The Z64 is manufactured in Taiwan and was distributed in the US by Harrison Electronics. It uses a Zip drive to store and load cartridge and save information. The system is based around a i386 compatible computer; the Z64 BIOS is actually an image of a FAT filesystem, and it boots an MS-DOS clone internally. Thus, it is pretty trivial to hack, and people have produced upgrades to the BIOS that add hard drive support or support for other removable drives like the Orb. The program Z64.EXE operates the on-screen display and loads the BIOS into memory for the N64 to access if it is turned on.
The Z64 came in three models, referred to as HW1, HW2, and HW3. HW1 only supported 128Mbits of DRAM. HW2 upgraded to 256Mbits of DRAM, and HW3 simplified the design in order to lower the price to 299.00 from $399.00US.
A Zip disk can hold approximately 750Mbits of information; that is, it just barely doesn't have enough room for three 256Mbit images.
One word that I would use to sum up the Z64 is "convenience". The Z64 is extremely easy to use. It has a nifty LCD display that you can use to load a game before the N64 is powered on, or to load a boot emulator or back up the cart in the slot (in case it is not a 6102 cart). In addition, if you turn the N64 on before loading a game, the Z64 has a nice BIOS menu that runs as a N64 program, like the CD64 BIOS. In this case, you have a small advantage over the CD64, since you are not forced to operate with a 6102 boot cart only; you can choose whether to use the BIOS or operate the LCD menu depending on what you want to do.
The Z64 also has a boot emulator built into the BIOS like the CD64, and can boot most games regardless of the host cart. The hacked 2.18c BIOS uses code from LaC's Universal boot emulator, and corrects problems with some 6105 games not detecting the expansion pak.
In the Z64 menu, you can set up options for each individual game, such as what boot chip it uses, slowdown function, tell it to redirect controller pack saves to the zip disk (for transfer to PC or copy to friends), or to PAL-fix it. The information is saved in an INI file on the zip disk. You can also set global options that are stored in the eprom of the Z64, like automatic patching, cheat loading, saving, etc. File management is pretty easy too, you can copy programs to another Zip disk, delete, and such.
Saving is handled by redirecting the save to the zip disk for each game. The Z64 can handle EEPROM, SRAM, and 4X EEPROM natively. However, SRAM and 4X EEPROM can be quirky. FlashRAM games must be cracked. The Z64 will attempt to download the first 64k of from a flashram cart, but this is only because the Z64 thinks it's actually handling SRAM. You can't depend on this "feature", and FlashRAM games certainly will not work with it.
If you have automatic saving turned on in the menu, the save process is completely transparent and quite convenient. The manual claims you must use a boot cart with EEPROM in order to save EEPROM and SRAM games. This seems to work fine for the most part. There are the occasional SRAM and 4X EEPROM games that will need to be cracked. And FlashRAM games are best off being cracked.
Also, the Z64 can automatically load APS or IPS patch files for trainers, intros, or cracks. No more hand-patching on your PC, just name the patch file with the same base name as your program file (i.e. zelda64.rom, name the patch zelda64.aps or zelda64.ips depending on the type) and the Z64 will automatically apply the patch after loading the program. The Z64 can load Z64/CD64 format (big endian) files, and like the CD64, it can also load Doctor V64 (little endian) format files.
The Z64 is an extremely well-constructed unit. This may be due to the fact that it is built in Taiwan, where the CD64 and Bung units are built in Hong Kong and China. It is solid and looks very nice on top of your N64. It definitely does not have as many quality problems as the CD64 has had. (There was a problem with some HW3.0 units where a transistor needed to be replaced to correct freezing problems.) However, this quality does come at a high price.
The Zip drive is a standard PC ATAPI Zip drive, and can be easily replaced if anything goes wrong with it. The RAM is standard PC EDO RAM like the CD64, and can be replaced with standard type 72-pin SIMMs.
The Z64's biggest advantage is that there is literally no PC needed for most tasks. You can back up, copy, bootemu, save, delete, etc all from within the unit itself. Since the saves are on zip disk, there is no shuffling save data via the PC link. The only time I've needed to use a PC is for loading patch files for problematic games.
The Z64 supports 256MB only, like the CD64. Obviously this is only a problem for a few games, so it's not that big a deal. Also like the CD64, it can dump >256Mbit carts, even though it cannot play them.
No PC connection. Unfortunately, there is no way to connect a PC to the Z64 at all. So doing things that are possible with the CD64 like editing memory, running a debugger, downloading save information directly from a cart, etc, are not possible. This may or may not be a big deal. Personally, it's a trade-off between simplicity of use and flexibility between the Z64 and CD64. The Z64 is designed to be operated by a couch potato, where the CD64 will require some computer knowledge and manual intervention to get the most from.
At $399.00, dropped to $299.00 at HW3 revision, the Z64 has always been the most expensive unit. Even the upgrades from Harrison were expensive. You might say that there is a price to pay for quality, but price alone may warrant the buyer to look elsewhere. (The CD64 is less than $200.) I'm not sure if I would ever have gotten a Z64 if I hadn't found a HW3 being sold for $100. :P
All in all, I would summarize the Z64 as the ideal playtime or living room unit. It's very portable, works well for almost all game-playing tasks, won't break down easily, and is brain-dead easy to use. The only real drawbacks relate to the price, and the lack of a PC connection, which was by design anyway.
Z64 Features
* Sits on top of Nintendo 64© game cartridge slot. N64 sees it like a regular game cartridge!
* Simple installation and use - plug and play with only 3 buttons
* New On Screen Display mode that includes Z64 configuration and Action Replay Codes (GameShark© emulation)
* Only a power cord, no other cables - Z64 uses N64 video connection and game controllers
* Independently operating without connecting to computers or any peripherals
* With built-in 256Mbits memory (32MB DRAM)
* With built-in IOMega ZIP-100© drive
* Capable to backup game cartridges to ZIP© diskette as files
* Capable to play back game files stored on the ZIP diskette
* Capable to play game cartridge directly with Z64 pass-through slot
* Capable to store game record, EEPROM or SRAM, onto ZIP diskette
* Capable to delete game files stored in the diskette
* Store average 6-12 files, non-compressed or compressed (.zip format), in one ZIP-100 diskette
* Average 16-32 seconds to backup each game file
* ZIP drive sleep mode - save the wear and tear of disk and drive
* Capable to automaticly detect defective game cartridges
* Multi-Lingual support.
* Future game play support for other game console - Gameboy, SNES, etc.
* Functions and features are upgradable with Flash BIOSZ64 Operating Specification
* Range of Working Temperature: 0 to 55 degree centigrade*
* Range of Storage Temperature: -25 to + 80 degree centigrade
* Net Weight: 1.5 kg
* Power: 5W
* Input: AC100 - 240V, 0.2A
* Output: DC +5V / Maximum: 1.6A
* Dimension: 24cm x 14cm x 13cm (L x W x H)* Internal RAM: 256Mbits (32MB, 8x32 72-pin NP EDO SIMM) Standard
* Media: 100MB PC Format Zip disk
* CPU: 386SX/40MHz
* BIOS: FlashableThe Z64 Modification with HardDisk, ORB 2.2 GB or Zip250 support.
The software modifications below, allow you to exchange the internal Zip100drive for a higher capacity drive.
Upgrading with the ORB or the ZIP250 is easy. Both have the same connectors, mounting holes and power-requirements as the replaced ZIP100 drive.
The Harddisk upgrade is more difficult. The Z64 has 5Volt only, so I suggest to use a 2.5"HD. If you put a 3.5"HD in the Z, you must provide an extra 12V power. Some possible setting are shown in the pictures page and the page with access times shows the impressive enhancement with this upgrade.How to upgrade:
[1] - Download the BIOS image file at the bottom of the page, extract it and rename it Z64BIOS.IMG
Use this file on a ZIP disk to update your Z64 BIOS
ATTENTION -use the LCD panel- keep your N64 turned off during the BIOS update procedure - better remove the Z from the N64 before BIOS update. After this BIOS update your Z should continue to work with the ZIP drive as before.
What if the flash-upgrade fails? You risk to lose all disk-access.
This is a dramatic case, but the Z is not completely lost.
Scroll below to help you bring it back to normal.[2] - Turn the Z64 off, open it and install the new drive.
-- Harddisk partitions must be FAT16 and formatted --
For small harddisks, attach the Z HD as single HD to a PC and use a DOS5 boot-disk to partition and format.
For harddisks bigger 8.4Gig, the Z64 can "only" access the first 8Gig of the drive, and the disk should be partitioned according this picture:
(Windows 2000 Disk Management)-- For ORB disks use the ORB-Tools to partition & format --
Version 2.18 of the Z-BIOS is not from MR. Backup. It was released to the internet in July 2000 and it's fully functional. It includes Lac's Bootemu and is modded to use Zip100/250 HDs and ORB drives. Still not fixed is the proper handling of Flash Maemory: for those carts that have it, saving is only supported on the boot card.
Contains the OnSpec HD driver supplied with the ORB-tools and system files from DR-DOS 7.03.
Connect the ZIP as slave when using HD and ZIP together. In this case, the Z must be off for disk change.
ORB and ZIP can't be connected the same time.
The Z displays up to 6 disk partitions as folders Disk-2 to Disk-6 (or 5 and the ZIP).
If the first drive (root) contains a file "Z64START.BAT", this file is processed as DOS batch file at power on.
Technical info for BIOS modifications - How it was done:
The Z64 BIOS contains a complete 444k PC BOOT-Disk with PC-DOS drivers.
The virtual-disk was extracted with a HEX Editor from address 01000-6FFFF of the released BIOS file. This BIOS part (a file of 444K) is a PC-disk image.
With WINIMAGE it is possible to read/write/delete the individual files of the 444K image. Most files are compressed with PKLITE, to save space.
The complete 512K Z64BIOS file can also be used with Winimage, but for extraction of files only, not for changes. It can not save properly.
To make a valid new FlashBIOS the modified 444K file was put back into the original FlashBios file, at the same address used for extraction, The checksum was updated by running the program MKCKSUM.EXE, available in the DX-BIOS source (see below) you can download at DEXTROSE.
Command : mkcksum biosfilename 2xx (substitute biosfilename with the actual name of the file and x=version number)Z64 Hardware Revision 2: ACCESS TIMES
Disk access comparison chart (load and save times for TUROK2 (256MBits) in seconds, free size in MBits)Tested with a 2.2Gig ORB-Disk, 4.8Gig 2.5' IBM DADA24860, 2Gig SeagateST32140A, 20Gig IBM-DJNA-352030, ZIP250 Drive and inbuilt ZIP100
ORB specific diskhandling with the current software
* The Z doesn't boot without disk, or disk inserted too late.
* Use the ORB-Tools to partition & format the disk (FAT16)
* After a diskchange, the Z64 must be rebooted. Diskchange notification is not functional.
But with 2 Gig you won't change disks that often anymore.
* Sleepmode, starts after fixed idle-time, and is not controlled by the Z64.exe bios.
However the wakeup works fine with all read/write requests.
* Inside the drive, the ORB Disk is fragile.
Don't move or transport the drive with a disk inserted ( The same as for ZIP disks).
* My disk is nearly full and all files can be accessed from Z64 and from a Windows PC
* To avoid overheating, you should keep the N64 expansion-pak cover open.
This is not only true for Z64 with ORB drives, but for all N64 users.
* Legal *
Read the terms and conditions of this agreement carefully before using this software. If you for any reason, whatsoever, cannot accept the conditions in this agreement, you are not permitted to use it. The software - or modified version of it - may be incorporated, in its original archive form, into software collections or archives which are not freely redistributable, as long as it is clearly stated that the software itself remains freely redistributable in a non-commercial environment provided that NO payment of any kind is charged for it. This production is provided "as is", without warranty of any kind or fitness for a particular purpose, either expressed or implied, all of are hereby explicitly disclaimed.
In no way me, Ravemax or other members of Dextrose and also your Z64-seller can be made liable for any damages that are caused. You are using the Z64-source and tools at your own risk!
A BIOS image can be divided into 3 different parts:- A flash-driver, which is resposible that the EEPROM "eats" your image
- Some "information"-area, where e.g. the version-number and checksum is stored
- A virtual bootdisk - thats what you should care about.Ahh bootdisk sounds good and wow it can also be divided...- DOS-system-files (remember "format /s"), makes the BIOS act like a virtual bootable disk (drive a:)
- Z64BIOS-files (MRB/ROM/DISK - from here when you create a new one)Oh, come on - how does it boot ?1. The Z64 loads the DOS-system-files
2. Then the DOS opens the CONFIG.SYS and sets (loads) the BOOTZ64.EXE as shell (replaces command.com).
3. This Bootz64 is responsible for initializing the necessary drivers and to start the Z64-menu (Z64.EXE).That's all...
* I wanna create my own BIOS-image *
1. Compile ZCI (rename to Z64.EXE) and BootZ64.EXE
2. Copy these files and all other necessary (e.g. patches, drivers) into /MRB/ROM/DISK
3. Run !MAKE.BAT
* Development w/o flashing *
Since I dont wanted to buy or grab from Act (I dont own a EEPROM-writer) a new BIOS chip, every time killed another one - I (and Hartec) came up with the following development-method:I modified the BootZ64.exe (startup-executable) so that it searchs for Z64.EXE (menuhandler, more or less the BIOS) first on the ZIP-disk and only if it doesnt exists it loads the "normal" from the virtual bootdisk.1.) Upgrade with the provided "Z64BIOS.IMG", its a modded 2.00Beta
2.) Put a Z64.EXE (when you want to test it) on ZIP
3.) Insert disk (Z64 powered off)
4.) Turn Z64 on
* Add-ons *
The Add-ons are some-kind of system-extensions, which are on the users-disk in the "/BIN"-directory.Every add-on needs a description file (desc.ext), which describes the type and other things. So everytime the disk is changed the BIOS rereads the available descriptions and adds valid files (with .ext) to the filemenu.
* Other things you may want to know *
- Known bugs : to much to be listed here, just find out ;-)
- The compiler is Turbo C++ 3.0
- I have a HW1+HW2
- The Mitsumi-driver (not included) should work on more or less every ordinary CD-drive
- Special greetings: Mr.Backup & Visoly
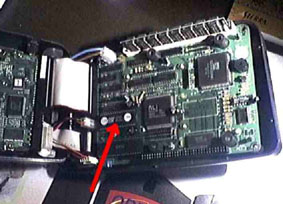
Z64 BIOS-CHIP Rescue Page
FLASHING the BIOS chip can go wrong and leave you with an unusable Z64.
In this case you have to open the Z64 and remove the flash-chip for reprogramming.
If you don't want to do it yourself, you should ask in a PC repair shop. The Z64 is a PC.
The red arrow marks the flash-bios chip in my Z64 HW2.
It is a 5V 4Mbit 150 ns flash EEPROM (28SF040 from SST)
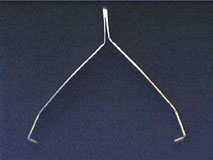
The chip is in a 32PIN DIP socket.Remove the flash chip:
Make sure the power is off and observe the usual anti-static procedures.
If you have no special IC extraction tool, take a small flat-tip screwdriver. Place it between the IC and the socket. Pry up both ends of the chip a little at a time so that all pins come out at the same rate.
Store the chip in a few layers of aluminum foil.
From an old pair of tweezers.
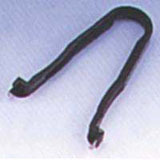
But if you can afford a few dollars,
you should get a commercial toolReprogramming:
There are many options to get the chip programmed.
- Ask a Z64 distributor to send you a new preprogrammed chip.
- Download the chip copy below and ask in a PC repair shop for programming the file to the chip.
- A PC-BIOS programming service.And for experts only:
Use a PC with a 5V 32PIN DIP flash BIOS as chip-programmer (remove the sticker from the top of the PC-BIOS chip and get the chip data from the internet):
The UNIFLASH pc-flash program supports the Z 4Mbit chip for mainbord bios updates.
5V flash chips may also be in expansion cards -SCSI,Network- but you need the corresponding upload program.Insert the new or reprogrammed chip:
Align the notch in one end of the chip with the drawing on the main-board. Check that all pins of the flash-chip line up with the holes in the socket.
Slowly press the chip into the socket and watch the pins of the chip to be sure they are going down in to the socket and do not bend.